Assembling the Marshall Picker Rock Picker
To get started with the assembly of your Marshall Picker, remember to read the operator’s manual for the ATV/UTV to become totally familiar with the controls and instruments. Be sure you know how to stop all equipment operation in case of emergency.
The Marshall Picker comes with the following features:
- 2” coupler
- Self-contained 12v hydraulics
- Durable 10ga steel rock box w/ Mesh floor
- Heavy duty, EZ-Lube hub/spindles
- Deep Cycle Battery included
- Fits 15”-22”-30” row spacings
- Machine weight – 680lbs
- Powder coat paint
- Hydraulic Dumping Rock Box
When you purchase a Marshall Picker we talk to you about the equipment you’re attaching the Marshall Picker to, the ATV/UTV hookup you’re using, and the weight and power of your gear.
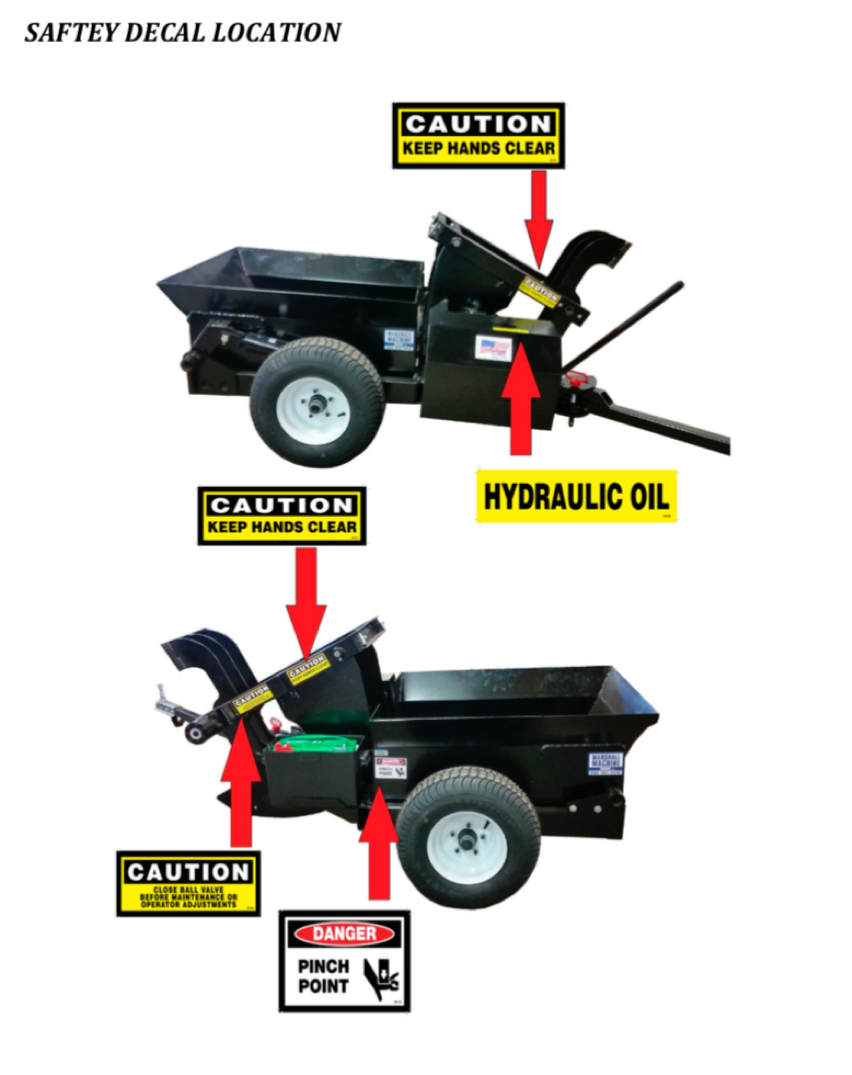
Safety Decals
Take time to review the location of the safety decals on the Marshall Picker, it’s important to comply with safety and operating instructions as well as the maintenance guidelines to get the best results from your Marshall Picker.
The ATV/UTV Hook Up
A 12v DC hook up connection is needed to maintain the deep cycle battery on the
Marshall Picker. The Marshall Picker comes with an ATV/UTV connector end, our customers are responsible for hooking up the ATV/UTV end of the 12v supply. It’s worth noting all wiring should be installed by your ATV/UTV dealer.
Once the machine is hooked to the ATV/UTV it’s important to check the hitch is securely fastened. Next make sure to ensure the cord from the handheld pendent is not dragging the ground.
The Hitch Bar and Tire Pressure
Some Marshall Pickers may arrive needing the hitch bar and wheels to be assembled to the main unit. When assembling the wheels to the studs, use no more than 75 ft/lbs of torque and remember to tighten again after first use. Tire inflation should also be checked after assembly and should not exceed 50# of pressure.
Inspecting Your Marshall Picker, Checking the Bolts
After receiving your Marshall Picker and before initial operation, double check the entire machine so that all bolts are securely tightened, then recheck after 2 and 8 hours of operation. You’ll also want to check that all grease fittings are in place and greased properly.
Remember, never make adjustments, lubricate or perform any service on the machine while it is in operation.
Tires and Reel Bearings
Make sure to inflate tires to the manufacturer’s recommended inflation pressure and check wheel bolts for tightness. For regular maintenance, grease both reel bearings after every week of use. We recommend changing the hydraulic oil be once a year.
Efficiency with the Marshall Picker Hand Control
The hand control is so easy to use we love feedback like this:
“The push-button hydraulics are amazing and I rarely have to get off the 4 wheeler…. My husband jokes that it is the best piece of farm equipment he’s bought for me – and I agree!” – Patricia G, Elma, Iowa
Here’s a breakdown of the hand control:
- Reel Up lifts the reel and rake portion of the machine from ground level.
- Reel down lowers the reel and rake portion of the machine to ground level.
- Box up lifts the rock box to dump contents.
- Box down lowers the rock box to standard position.
- Releasing the buttons will automatically stop the movement functions.
- The real section is in sequence. First the rake will raise and lower and then the reel will begin to rotate.
We’re proud of the simplicity of the Marshall Picker and get great satisfaction from our customer feedback.
Contact the Marshall Machine Shop
Contact us to find out more about our equipment. We’ll work with you and find out what your needs are. We are continually developing our own equipment and appreciate your feedback!
Ready to give the Marshall Picker a try? Contact Us and we’ll get you all the details.